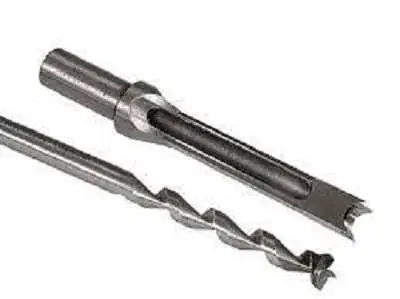
A mortise bit allows you to drill a mortise that perfectly matches a tenon on the mating piece. The mortising bit is driven from the drill press, while the chisel cuts the sides of the mortise. The bit and chisel are held in special chucks that allow you to adjust their positions relative to each other.
Insert your chisel into the chuck. Be sure it is inserted so it will cut at 90 degrees to the workpiece. Adjust its position until its right, then tighten the chuck securely.
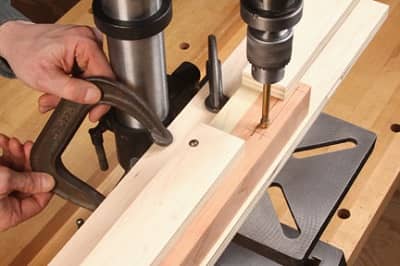
Slip the appropriate mortising bit through the chisel and tighten it in your drill chuck. Position your workpiece against your rip fence, install the hold-down and go to work! The attachment holds the chisel to keep it from rotating while your drill chuck holds and spins the mortising bit that rides inside the chisel.
Table of Contents
How To Set Up a Mortise Bit On a Drill Press?
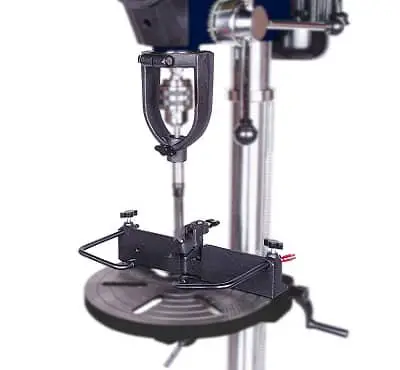
Mortising Attachment
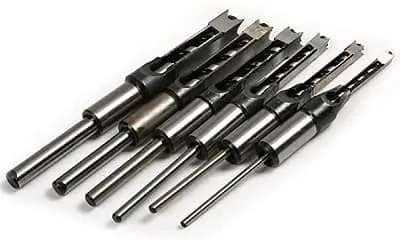
The mortising attachment is sized for use with a 3/4-in. chisel. The bit that comes with the set is 1/2 in. wide but you can use any bit from 1/4- to 9/16-in. wide by simply changing out the bushings on the attachment. Mortising bits from 3/8 in. to 5/8 in. are available at most hardware stores and home centers for about $6 each.
Slip the appropriate mortising bit through the chisel and tighten it in your drill chuck. Position your work piece against your rip fence, install the hold-down and go to work! The attachment holds the chisel to keep it from rotating while your drill chuck holds and spins the mortising bit that rides inside the chisel.
A drill press is a good way to make mortises, but the standard 3/4-in. a drill chuck isn’t up to the task of holding a mortising bit — a.k.a. Forstner bit — securely enough for the precision drilling required.
That’s why we use this specialized hold-down attachment that clamps to your rip fence and supports the chisel while you drill.
How To Set Up a Mortise Bit On a Drill Press?
The hold-down has a sliding collar that adjusts to work with bits 3/8 in., 1/2 in., 5/8 in. or 3/4 in. in diameter, and up to 6 in. long. It uses a single brass setscrew to grip the bit and prevent it from rotating as you drill
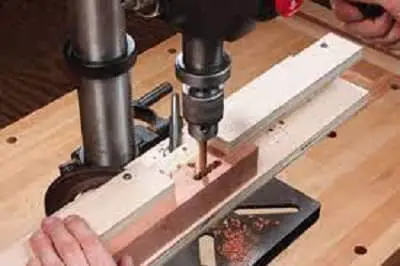
To use it, slip the appropriate mortising bit through the chisel and tighten it in your drill chuck. Position your workpiece against your rip fence, install the hold-down and go to work! The attachment holds the chisel to keep it from rotating while your drill chuck holds and spins the mortising bit that rides inside the chisel.
First, clamp your workpiece on the drill press table and position it against a fence. Then, slip the appropriate mortising bit through the chisel and tighten it in your drill chuck. Position your workpiece against your rip fence, install the hold-down and go to work!
The attachment holds the chisel to keep it from rotating while your drill chuck holds and spins the mortising bit that rides inside the chisel.
The device can be used with any length of bit, but you need only three to create mortises of different sizes. After you set up each bit for use, you should never have to make any other adjustments on the tool itself — just chuck it in your drill press, mount the hold-down assembly and start drilling.
Like all good woodworking, the devil is in the details, and this mortising attachment is no exception.
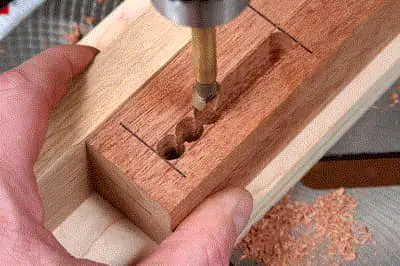
The basic idea is simple: The attachment holds a square chisel with a round mortising bit riding inside it. The chisel rides in a slot (called a “mortise”), which you cut by plunging the bit through your workpiece.
The first step is to choose the right sizes for your mortising bit and chisel. The chisel should be about 1/8-in. larger than the diameter of your bit, and you should use a bit that’s about 1/2-in. smaller than the width of your mortise.
For example, if you’re cutting 3/4-in.-wide mortises, you’ll need a 1/4-in.-dia. bit and 5/16-in.-sq. chisel (or a 3/8-in.-sq. chisel for 3/8-in.-dia. bits).
Next, slip the appropriate mortising bit through the chisel and tighten it in your drill chuck. Position your workpiece against your rip fence, install the hold-down and go to work! The attachment holds the chisel to keep it from rotating while your chisel is installing.
Can I Use a Mortise Bit In a Drill Press?
These days, a drill press can be an essential tool for woodworking. Whether you’re creating a piece of furniture or just fixing up your backyard fence, a drill press can help.
A mortise bit attaches to the drill press to help you create holes for your woodworking project. These bits are available in many different sizes, so you can choose the one that best fits your needs.
To use a mortise bit, you’ll need to attach the chuck to the drill press and lock it in place. Then adjust the fence so that it’s parallel to the bit and clamp it into place.
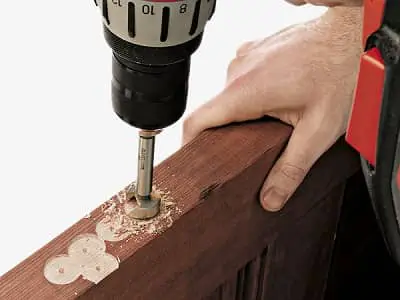
Finally, use a center punch to mark the center of where you want your hole and turn on the drill press.
The key to using a mortising chisel bit is making sure that your drill press is set up properly before you start working. First, check that the fence is in line with the bit and then clamp it down.
Once everything is lined up, mark where you want to make your hole with a pencil or other marking tool. Then use a center punch to make a small indentation in that spot before turning on your drill press.
How Do You Attach a Mortising Attachment To a Drill Press?
Mortising attachments are designed to allow a drill press to cut mortises. The drill bit is inserted into the attachment and the attachment is clamped in place on the drill press table.
The mortise can be cut using the drill press table to guide the mortise chisel bit through the workpiece.
The mortising tool is a specialized drill bit with square edges used to cut square holes in wood. These holes are typically used for mortise and tenon joints, which are a type of joint that uses a square hole (mortise) in one piece of wood that fits into a square peg (tenon) on another piece of wood.
Mortising tools come in two styles – chisel style and spur or brad point style. Chisel-style bits are generally made from high-speed steel, while spur or brad point bits are made from carbon steel. Both styles can be used in hand-held power drills, but only the chisel style bit can be used in a drill press.
Chisel-style bits have sharp edges to cut the square hole into the wood, while the spur or brad point bits make flat bottomed holes using small spurs at the tip of the bit. Spur or brad point bits cannot be used in a drill press because they do not stabilize themselves against the sides of the hole being drilled.
Mortising attachments for drill presses hold the chisel-style bit in place against the side of the wood as you drill your square hole. They also allow you to adjust for different-sized mortises by adjusting the width and height.
How Do You Make a Mortise With a Drill Press?
A mortise is an elongated hole that is used for the insertion of a tenon or dowel. Tenons and dowels are used in the construction of joints to tie two pieces of wood together, such as chair legs and the chair seat.
Mortises are cut with a chisel, router, or drill press. A drill press can perform this task more efficiently than the other two, especially if it has a mortising attachment.
Step 1
Lower the table on your drill press to its lowest position.
Step 2
Open the chuck jaws on your drill press and insert the shank of your mortising bit into the chuck so that it seats firmly. Tighten the chuck jaws around your mortising bit until it will not turn.
Step 3
Adjust the height of your drill press table to suit your needs. If you are using a mortising attachment, you will need to attach it to your drill press first, then adjust its height accordingly. This will vary depending on the size of your mortising bit and/or attachment, as well as the project at hand.
How Do You Use a Mortising Chisel Bit?
You can use a mortise bit in a drill press. The mortising attachments used for this purpose are available from various manufacturers, including Delta and Porter-Cable.
Mortising attachments can be attached to the standard drill press column or added to the quill. You can also purchase an additional quill with a mortising attachment included.
The device is attached to the drill press column either by clamping it around the column or by bolting it to the column. A long mounting bolt is inserted through the attachment’s housing and into a pre-drilled hole in the drill press column.
After attaching the device to the drill press, you must attach a mortising bit to the device’s square chucking mechanism. The chucking mechanism is secured with two screws that fit into slots on opposite sides of the chucking mechanism. This provides four points of contact that secure the bit firmly in place.
The chucking mechanism has three adjustments: depth adjustment, width adjustment, and height adjustment. The depth adjustment controls how far into the workpiece you want to cut.
The width adjustment controls how wide you want your mortise to be, while the height adjustment controls how high above your workpiece you want your mortise to start. Adjustments are made with knobs located.
Can You Use a Mortising Drill Bit In a Drill Press?

A mortising attachment is a tool that you can attach to your drill press in order to create holes. The mortising attachment can be bought at any hardware store, and it is installed on the drill press in less than 20 minutes.
Measure the bit size of your drill press. The bit size is located on the chuck, which is the part of the drill that holds onto each bit. If you do not have a drill press bit, then you can use a 1/4-inch bit on your drill press.
Thread the bit into the center shaft of the mortising attachment. You can do this by turning it clockwise until it stops, indicating that it is secure.
Locate the drill press table and raise it up until you are able to slide the T-shaped bar underneath it and through one of the two slots in the table. You will need to loosen or remove any clamps that are holding down on the table before you will be able to do this.
Slide a bolt through one of the holes on either side of the T-bar and tighten it with a socket wrench so that the bar cannot move.
Securely fasten one end of an adjustable clamp onto one side of your work surface and then secure its other end to do that work.
How Do You Mount a Mortising Fence To a Drill Press?
A mortising machine is a specialty tool designed to drill very deep holes at right angles to a work piece. That’s usually done with a chisel, but the machine makes it much easier because it holds both the bit and the chisel square to the work piece.
The bits and chisels for a mortiser are called mortising bits and chisels. They’re available in sizes from 1/4 inch to 1 inch wide, in sets or individually.
Most people own a drill press rather than a mortising machine, so if you don’t have one of those machines, you can use your drill press to do some basic mortising.
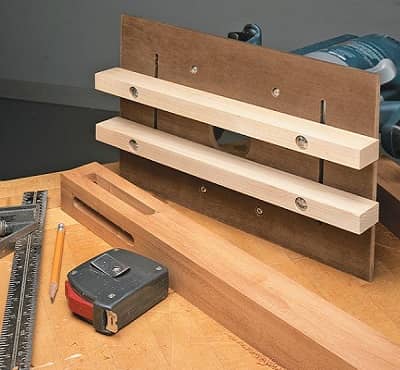
You can buy a jig that mounts on your drill press table and works with either size bit (1/4 inch or 3/8 inch). The jig holds the bit and lets you move it into position, then locks in place.
A fence on the jig helps align the workpiece. To cut grooves, move the fence back and forth over the bit as you plunge it into the wood.
You can also make your own jig using scrap stock and metal brackets. You need one piece that bolts through your table at 90 degrees to the column.
What Are Mortising Bits And Do I Need Them?
Several variables affect your success. The main factor is whether you’re using a self-feeding bit or one that you power through the wood manually.
Self-Feed Bits
A self-feed bit has a threaded shank that fits into a socket in an adaptor chuck mounted on your drill press spindle. Unlike standard bits, which rely solely on feed pressure to pull them into the work and rotation to remove chips, these bits have a screw-like thread on their bodies that drives them through the wood as you tighten them in their chucks. The threads are usually spiral-shaped but can also be fluted.
The advantage of using these bits is that they hold themselves in position as you feed stock into them. That makes them ideal for use with simple jigs that don’t have adjustable fences and only allow you to center stock between bit and column or spindle.
Their drawback is that they can bind if they aren’t positioned exactly right at the moment.
Do You Need The Whole Setup To Mortise a Hole?
Setting up a drill press for mortising is very much like setting it up for drilling. You need to place the work between a fence and the bit, adjust the table height so that the bit will cut deeply enough, feedstock into the bit slowly, and withdraw it from the cut before turning the machine off.
Several variables affect your success. The main factor is whether you’re using a self-feeding bit or one that you power through the wood manually.
Frequently Asking Questions
1. How Do You Set Up a Mortise Machine?
You should set up a mortise machine by setting the drill press and then turning the lever to fit it in place. Next, you should use a square drill bit to make sure the bit is secured tightly.
2. How Do You Install a Square Drill Bit?
When installing a square drill bit, you need to make sure that it is secure in the chuck. Once you have done this, you will be able to use a mortise chisel bit in your drill press.
3. How Do You Use a Mortise Chisel Bit In a Drill Press?
You can also use an auger bit for drilling through wood with a hand brace or power drill. If you are using the mortising machine, you need to space out your cuts so that they don’t overlap each other.
4. Why Do You Space Your Cuts Out When Using The Mortising Machine?
A mortise and tenon joint is one of the strongest ways to connect two pieces of wood together. The tenon is the end of one board that fits into a hole cut into another board called a mortise.
Up Next: WEN 4210 vs 4210T Drill Press: Similarities & Differences